About this sample
This is a sample of my technical writing work for Red Hat.
Content created: March–August 2021
Content status: Drafts of chapters after SME and peer reviews and before QA review
Quick facts:
- I kept only the chapters to which I contributed, and auxiliary text for context.
- I was not responsible for the the visual style.
- This page is only a small part of the Administration Guide.
- The content on this page will be published on the Red Hat Customer Portal once the future version of Directory Server will have been released.
- Red Hat Directory Server is an enterprise implementation of LDAP server.
Edited for legal compliance.
URL for the original documentation: Product Documentation for Red Hat Directory Server (current version)
Configuring directory databases
Configuring and managing Red Hat Directory Server databases
Abstract
- Providing feedback on Red Hat documentation
- 1. Storing suffixes in separate databases
- 1.1. Role of a suffix in the data structure
- 1.2. Root suffix vs. sub-suffixes
- 1.3. Several root suffixes
- 1.4. Creating a root suffix using the command line
- 1.5. Creating a root suffix using the web console
- 1.6. Changing the default naming context
- 1.7. Creating a sub-suffix using the command line
- 1.8. Creating a sub-suffix using the web console
- 2. Configuring referrals to redirect requests to other hosts or
entries
- 2.1. Redirecting all requests from an instance to a different host
- 2.2. Redirecting requests for non-existent DNs to a different directory using a default referral
- 2.3. Redirecting requests for a specific entry to a different host or entry using smart referrals
- 2.4. Redirecting requests for a suffix to a different host or entry using the command line
- 2.5. Redirecting requests for a suffix to a different host or entry using the Web Console
- 3. Using views to create a virtual directory hierarchy
- 3.1. About views
- 3.2. Directory design considerations
- 3.3. Benefits of using views
- 3.4. Compatibility of views with other features
- 3.5. Compatibility of views with client applications
- 3.6. Creating a view
- 3.7. Creating indexes to improve the performance of views using the command line
- 3.8. Creating indexes to improve the performance of views using the web console
- 4. Switching a database to read-only mode
- 5. Switching an instance to read-only mode
- 6. Deleting a database of a suffix that is no longer needed
Chapter 1. Storing suffixes in separate databases
You can design distributed data storage logic in Directory Server by dividing data in an instance into several databases. You can use suffixes of directory trees as the method of data division.
You can create several directory trees and store them in separate databases by root suffixes. You can also divide a single directory tree into branches and store the branches in separate databases by sub-suffixes.
1.1. Role of a suffix in the data structure
Directory Server presents data in hierarchical structures called directory trees (DIT). The following is a simple directory tree:
Figure 1.1. Simple directory tree with a single root suffix
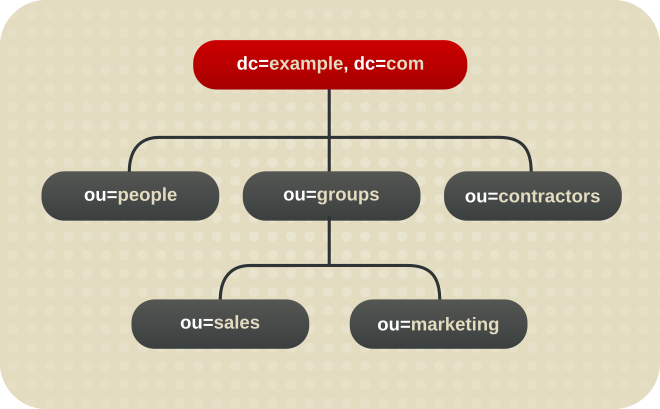
Each directory tree has a single root entry which defines the naming context of that directory tree, such as dc=example,dc=com.
You can store various pieces of a directory tree in different databases, and then distribute these databases across multiple servers.
You can use suffixes to define the distribution logic of your data storage. A suffix associates a branch (subtree) of the directory tree with a particular database.
This way you can have multiple databases in a single instance of the server. You are not confined to a single database.
1.2. Root suffix vs. sub-suffixes
A root suffix associates an entire directory tree (DIT) with a database. The root suffix does not have a parent suffix.
When you want to store a branch of a directory tree in a separate database, you create a sub-suffix, which associates the branch of the tree with a different database than ancestors of the branch. A sub-suffix must be attached to a parent suffix. The parent suffix can be the root suffix or a sub-suffix, which means that a branch of any subtree can be stored in a separate database.
Figure 1.2. Directory tree with a sub-suffix in a separate database
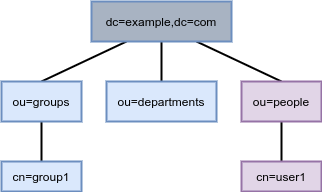
In this example, the ou=people,dc=example,dc=com sub-suffix is stored in one database and the rest of the directory tree under the root suffix is stored in a different database.
Advantages of using sub-suffixes:
- Database maintenance (import/export/indexing) is easier.
- Sub-suffixes can be stored on separate disks, which helps with disk space concerns.
Disadvantages of using sub-suffixes:
- Clients cannot query the root suffix and have sub-suffix entries returned. Clients must begin a search at the sub-suffix level to retrieve entries from that sub-suffix.
- Replication needs a separate configuration and replication agreement for each sub-suffix.
Additional resources
- TBA Single suffix in several databases
- TBA Searching algorithm
1.3. Several root suffixes
You can also have several directory trees (DIT) with different root suffixes in a single instance. For example, when you want to separate some portions of data from the user root.
Figure 1.3. Several directory trees defined by root suffixes
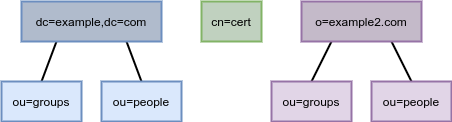
When clients search the dc=example,dc=com tree, the search does not return entries from the other trees, because they are off limits to the searching algorithm.
You can then choose which directory tree and naming context is default for your instance.
Additional resources
- TBA Single suffix in several databases
- TBA Searching algorithm
1.4. Creating a root suffix using the command line
This procedure instructs you how to create the root suffix of a directory tree on the command line.
Procedure
-
Optional: List the suffixes and back-end databases that are already in use:
#
dsconf -D "cn=Directory Manager" ldap://server.example.com backend suffix listdc=example,dc=com (userroot)The name in parentheses is the back-end database that stores the data of the corresponding suffix. You cannot use an existing database name when you create the root suffix in the next step.
-
Specify the DN of the root suffix in the
--suffixargument and associate it with a new database using the--be-nameargument:#
dsconf -D "cn=Directory Manager" ldap://server.example.com backend create --suffix="dc=example,dc=net" --be-name="example"
Verification
- List the suffixes and databases using the command from the first step of this procedure.
1.5. Creating a root suffix using the web console
This procedure instructs you how to create the root suffix of a directory tree in a browser.
Prerequisites
- You are logged in to the instance in the web console.
Procedure
-
Under
Database, click the button below the configuration tree. -
Fill in the
Suffix DNandDatabase Name. -
Select
Create The Top Suffix Entryand click .
Verification
- The new suffix should appear in the tree of suffixes.
Additional resources
- TBA xref Logging in to an instance in the web console
1.6. Changing the default naming context
A naming context is an attribute of a directory tree (DIT) that defines the root namespace for entries in that DIT. When you structure data in your instance with multiple root suffixes, your instance has several DITs, each with a different naming context.
This procedure instructs you how to change the default naming context on the command line when you work with multiple root suffixes in your instance.
Clients that access your instance, may not know which naming context they need to use. The Directory Server signals to clients what the default naming context is, if they have no other configuration of a naming context known to them.
You set the default naming context in the nsslapd-defaultnamingcontext attribute in cn=config. Directory Server propagates this value over to the
Directory Server Agent Service Entry (root DSE) and clients can query it anonymously.
Prerequisites
- You have created the root suffix that defines the default naming context of your instance.
Procedure
-
Optional: View the current default naming context:
#
dsconf -D "cn=Directory Manager" ldap://server.example.com config get nsslapd-defaultnamingcontextnsslapd-defaultnamingcontext: dc=example,dc=com -
Replace the value of the
nsslapd-defaultnamingcontextparameter with the required naming context:#
dsconf -D "cn=Directory Manager" ldap://server.example.com config replace nsslapd-defaultnamingcontext=dc=example,dc=net
Verification
- View the current default naming context. The value should be updated.
1.7. Creating a sub-suffix using the command line
This procedure instructs you how to create a sub-suffix of a directory tree on the command line.
Prerequisites
- You created the parent suffix for the sub-suffix.
Procedure
-
Optional: List the suffixes and back-end databases that are already in use:
#
dsconf -D "cn=Directory Manager" ldap://server.example.com backend suffix listdc=example,dc=com (userroot)The name in parentheses is the back-end database that stores the data of the corresponding suffix. You cannot use an existing database name when you create the sub-suffix in the next step.
-
Specify the full DN of the sub-suffix in the
--suffixargument and associate it with a new database using the--be-nameargument and an existing parent suffix using the--parent-suffixargument:#
dsconf -D "cn=Directory Manager" ldap://server.example.com backend create --suffix="ou=People,dc=example,dc=com" --be-name="example" --parent-suffix="dc=example,dc=com"
Verification
- List the suffixes and databases using the command from the first step of this procedure.
1.8. Creating a sub-suffix using the web console
This procedure instructs you how to create a sub-suffix of a directory tree in a browser.
Prerequisites
- You are logged in to the instance in the web console.
- You created the parent suffix for the sub-suffix.
Procedure
-
Under
Database, select a suffix from the configuration tree that is the parent of the sub-suffix. - Click the and select .
-
Fill in the
Sub-Suffix DN, such asou=People, andDatabase Name. -
Select
Create The Top Suffix Entryand click .
Verification
- The new sub-suffix should appear among suffixes in the configuration tree.
Additional resources
- TBA xref Logging in to an instance in the web console
Chapter 3. Using views to create a virtual directory hierarchy
You can create virtual directory-tree (DIT) views to organize entries in custom groupings or hierarchies and thus navigate the standard DIT from various perspectives. This way you can save costs on management of your directory, and make navigation through entries more intuitive to the users of your service.
3.1. About views
Virtual directory-tree views, or views, are an optional layer of structure in addition to your standard directory tree (DIT) to categorize and search entries in your DIT.
Using views, you can create virtual directory hierarchies, so it is easy to navigate entries, regardless of their placement in the standard DIT. A view uses attributes of entries to include them in the virtual hierarchy, similarly to members of a filtered role or a dynamic group. To client applications, views appear as ordinary container hierarchies.
This way, you can initially place entries in a flat DIT and use views to categorize the entries in complex hierarchies without the need to move the entries. Additionally, entries can appear in multiple views, which you cannot achieve with a standard DIT.
You can think of views as named filters. Each view is an entry of the nsView object class and may have the nsViewFilter attribute, which says what entries are visible in that view. It may be desirable to restrict the type of entries to be returned by specifying an object class in the filter.
You can use a view as a container of other views and thus create the virtual hierarchy. A nested view inherits filters from its ancestors and restricts the view by combining its filter and ancestor filters with an AND, such as (&(container filter)(view filter)).
When a search is performed with a view as the base, entries that match the filter are returned from this virtual search space. The entries only appear to be nested under the view virtually, but they can actually be stored at any position in the DIT.
You can create a testing instance and explore how views work on data imported from the example file located in /usr/share/dirsrv/data/Example-views.ldif.
Additional resources
- TBA Dynamic groups
- TBA Filtered roles
- TBA Using organizational units as containers
3.2. Directory design considerations
When you design a directory tree (DIT), you naturally tend to categorize entries with hierarchies to reflect hierarchies in your organization. A standard DIT without views ties the position of an entry in the DIT to the distinguished name (DN) of the entry and therefore it is more suitable for use with fixed hierarchies.
Figure 3.1. Standard hierarchy DIT based on functional units

However, the nature of hierarchies in an organization is dynamic. Moving an entry in a standard DIT is time-consuming, because with every change of the position of the entry, the entry and all its descendants must also be renamed. This leads to service disruptions and additional expenses, especially in changes of top-level subtrees.
It is a good idea to design a flat hierarchy with categorization of resources by characteristics that do not change, such as the resource type (people, equipment, etc.), and capture this hierarchy in a standard flat DIT.
Figure 3.2. Standard flat DIT based on resource types

However, a flat DIT is not convenient for navigating the resources. Different users need to navigate the resources from different perspectives, such as an association with a functional unit or a geographical location, which would require additional tools or complex search queries in case of a flat DIT.
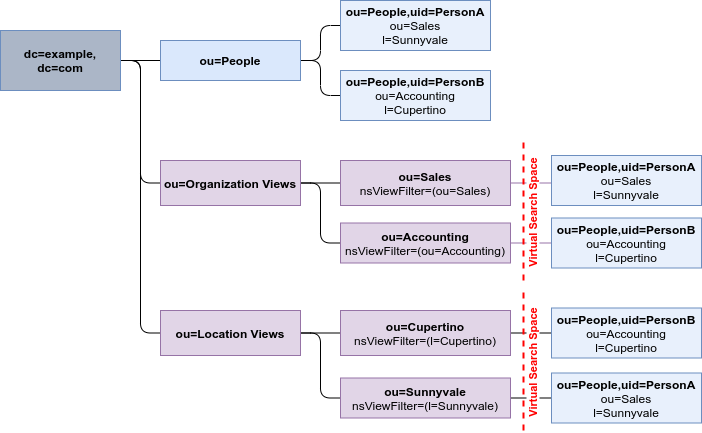
The solution to overcome the limitations of a flat DIT is provided by virtual hierarchies of views. Views allow creation of flexible hierarchies by separating the name of an entry from the position of the entry in the hierarchy. The virtual hierarchies are based on attributes instead.
Figure 3.3. DIT With Virtual Hierarchies of Views
3.3. Benefits of using views
Using virtual directory-tree views has the benefits of custom flexible hierarchies. Hierarchies are intuitive for users to navigate. Virtual hierarchies are more efficient for administrators to maintain than a deeply-nested standard directory tree (DIT).
- Flat and flexible naming
-
Views facilitate the use of a flat namespace for entries, because virtual DIT views provide navigational and managerial support similar to those provided by traditional hierarchies.
Whenever there is a change to the DIT, the entries never need to be moved; only the virtual DIT view hierarchies change. Because these hierarchies do not contain actual entries, they are simple and quick to modify.
- Reduction of costs in case of design errors
- Oversights during deployment planning are less catastrophic with virtual DIT views. If the hierarchy is not developed correctly in the first instance, it can be changed easily and quickly without disrupting the service.
- Fast and cheap maintenance
-
View hierarchies can be completely revised in minutes and the results instantly realized, significantly reducing the cost of directory maintenance.
Changes to a virtual DIT hierarchy are instantly realized. When an organizational change occurs, a new virtual DIT view can be created quickly. The new virtual DIT view can exist at the same time as the old view, thereby facilitating a more gradual changeover for the entries themselves and for the applications that use them. Because an organizational change in the directory is not an all-or-nothing operation, it can be performed over a period of time and without service disruption.
- Enhanced overall flexibility
-
Using multiple virtual DIT views for navigation and management allows for more flexible use of the directory service.
With the functionality provided by virtual DIT views, an organization can use both the old and new methods to organize directory data without any requirement to place entries at certain positions in the DIT.
- Intuitive user navigation
-
Views promote flexibility in working practices and reduce the requirement that directory users create complex search filters, using attribute names and values that they would otherwise have no need to know.
The flexibility of having more than one way to view and query directory information allows end users and applications to find what they need intuitively through hierarchical navigation.
- Shortcut to frequent search queries
- Virtual DIT view hierarchies can be created as a kind of ready-made queries to facilitate the retrieval of frequently-required information.
3.4. Compatibility of views with other features
When working with views, the search space is limited to entries under a single suffix. Users must base their search queries on a view to get results from a virtual hierarchy. You must take a slightly different approach to access control. You can use entry grouping with roles and classes of service in views.
- Multiple back ends
-
Virtual DIT views are not entirely compatible with multiple back ends.
The search is limited to a single back end, which means that the entries to be returned by the views must reside under the same suffix.
- Search space
-
The virtual search space is separate from the standard search space. The virtual search space is accessible only when a search is based on a view node with a filter. Otherwise it is a conventional search over the standard directory tree (DIT) that does not return entries contained under virtual DIT hierarchies.
For example, a search based on
dc=example,dc=comdoes not return any entries from the virtual search space of views; in fact, no virtual-search-space search is performed. Views processing occurs if the search base is such asou=Cupertino,ou=Location Views,dc=example,dc=com.This way, Directory Server ensures that the search does not result in entries from both places.
- Access control
- The use of views requires a slightly different approach to access control. Because there is currently no explicit support for access control lists (ACL) in views, create role-based ACL at the view parent and add the roles to the appropriate parts of the view hierarchy. In this way, take advantage of the organizational property of the hierarchy.
- Entries grouping
- Both class of service and roles in Directory Server support views. When adding a class of service or a role under a view hierarchy, the entries that are both logically and actually contained in the view are considered within scope. This means that roles and class of service can be applied using a virtual DIT view, but the effects of that application can be seen even when querying the flat namespace.
Additional resources
- TBA Grouping Directory Entries
- TBA Advanced Entry Management
3.5. Compatibility of views with client applications
Virtual directory tree (DIT) views are designed to mimic standard DITs to a high degree. The existence of views should be transparent to most applications; there should be no indication that they are working with views. Except for a few specialized cases, there is no need for directory users to know that views are being used in a Directory Server instance; views appear and behave like standard DITs.
Certain types of applications may have problems working with a views-enabled directory service. For example:
-
Applications that use the distinguished name (DN) of a target entry to navigate up the DIT.
This type of application would find that it is navigating up the hierarchy in which the entry physically exists instead of the view hierarchy in which the entry was found. The reason for this is that views make no attempt to disguise the true location of an entry by changing the DN of the entry to conform to the view’s hierarchy.
This is by design - many applications would not function if the true location of an entry were disguised, such as those applications that rely on the DN to identify a unique entry. This upward navigation by deconstructing a DN is an unusual technique for a client application, but, nonetheless, those clients that do this may not function as intended.
-
Applications that use the
numSubordinatesoperational attribute to determine how many entries exist beneath a node.For the nodes in a view, this is currently a count of only those entries that exist in the standard search space, ignoring the virtual search space. Consequently, applications may not evaluate the view in a search.
3.6. Creating a view
This procedure instructs you how to create a virtual directory-tree view on the command line.
Procedure
-
Add a view entry with the
ldapaddutility.Specify the
nsViewobject class and define a view filter in thensViewFilterattribute:#
ldapadd -D "cn=Directory Manager" -W -h server.example.com -xdn: ou=PeopleInRoom0466,dc=example,dc=com objectClass: top objectClass: organizationalUnit objectClass: nsView ou: PeopleInRoom0466 description: People in the room 0466 nsViewFilter: (&(objectClass=inetOrgPerson)(roomNumber=0466))
Verification
-
Perform a search with the view as the search base:
#
ldapsearch -D "cn=Directory Manager" -W -h server.example.com -x -b ou=PeopleInRoom0466,dc=example,dc=com
3.7. Creating indexes to improve the performance of views using the command line
Views are derived from search results based on a given filter. Part of the filter are the attributes given explicitly in the nsViewFilter. The rest of the filter is based on the entry
hierarchy, looking for the entryid and parentid operational attributes of the actual entries included in the view.
(|(parentid=search_base_id)(entryid=search_base_id)
If any of the searched attributes — entryid, parentid, or the attributes in the nsViewFilter — are not indexed,
then the search becomes partially unindexed and Directory Server searches the entire directory tree for matching entries.
To improve views performance, create the indexes as follows:
-
Create equality index (
eq) forentryid. Theparentidattribute is indexed in the system index by default. -
If a filter in
nsViewFiltertests presence (attribute=*), then create presence index (pres) for the attribute being tested. You should use this index type only with attributes that appear in a minority of directory entries. -
If a filter in
nsViewFiltertests equality (attribute=value), create equality index (eq) for the attribute being tested. -
If a filter in
nsViewFiltertests a substring (attribute=value*), create substring index (sub) for the attribute being tested. -
If a filter in
nsViewFiltertests approximation (attribute~=value), create approximate index (approximate) for the attribute being tested.
For example, when you use the following view filter:
nsViewFilter: (&(objectClass=inetOrgPerson)(roomNumber=*66))
you should index objectClass with the equality index, which is done by default, and roomNumber with the substring index.
Prerequisites
- You are aware of the attributes that you use in a view filter.
Procedure
-
Optional: List the back ends to determine the database to index:
#
dsconf -D "cn=Directory Manager" instance_name backend suffix listdc=example,dc=com (userroot)Note the selected database name (in parentheses).
-
Create index configuration with the
dsconfigutility for the selected back-end database.Specify the attribute name, index type, and, optionally, matching rules to set collation order (OID), especially in case of an internationalized instance.
#
dsconf -D "cn=Directory Manager" instance_name backend index add --attr roomNumber --index-type sub userrootRepeat this step for each attribute used in the view filter.
-
Reindex the database to apply the new indexes:
#
dsconf -D "cn=Directory Manager" instance_name backend index reindex userroot
Verification
-
Perform a search that is based on the standard directory tree with the same filter that you use in the view:
#
ldapsearch -D "cn=Directory Manager" -W -h server.example.com -x -b dc=example,dc=com (&(objectClass=inetOrgPerson)(roomNumber=*66)) -
View the access log in
/var/log/dirsrv/slapd-instance_name/access.The
RESULTof your search should not containnote=UorPartially Unindexed Filterin the details.
Additional resources
- TBA xref Logging in to an instance in the web console
- TBA About Index Types
- TBA Managing Indexes
- TBA Internationalization
- TBA Using Matching Rules OR Reference of OIDs
3.8. Creating indexes to improve the performance of views using the web console
Views are derived from search results based on a given filter. Part of the filter are the attributes given explicitly in the nsViewFilter. The rest of the filter is based on the entry
hierarchy, looking for the entryid and parentid operational attributes of the actual entries included in the view.
(|(parentid=search_base_id)(entryid=search_base_id)
If any of the searched attributes — entryid, parentid, or the attributes in the nsViewFilter — are not indexed,
then the search becomes partially unindexed and Directory Server searches the entire directory tree for matching entries.
To improve views performance, create the indexes as follows:
-
Create equality index (
eq) forentryid. Theparentidattribute is indexed in the system index by default. -
If a filter in
nsViewFiltertests presence (attribute=*), then create presence index (pres) for the attribute being tested. You should use this index type only with attributes that appear in a minority of directory entries. -
If a filter in
nsViewFiltertests equality (attribute=value), create equality index (eq) for the attribute being tested. -
If a filter in
nsViewFiltertests a substring (attribute=value*), create substring index (sub) for the attribute being tested. -
If a filter in
nsViewFiltertests approximation (attribute~=value), create approximate index (approximate) for the attribute being tested.
For example, when you use the following view filter:
nsViewFilter: (&(objectClass=inetOrgPerson)(roomNumber=*66))
you should index objectClass with the equality index, which is done by default, and roomNumber with the substring index.
Prerequisites
- You are logged in to the instance in the web console.
- You are aware of the attributes that you use in a view filter.
Procedure
-
Under
Database, select a suffix from the configuration tree for which you want to create an index. -
Navigate to
IndexesandDatabase Indexes. - Click the button.
- Type the name of the attribute and select the attribute.
-
Select the
Index Typesthat should be created for this attribute. -
Optionally, add
Matching Rulesto specify collation order (OID), especially in case of an internationalized instance. -
Select
Index attribute after creationto rebuild the index afterwards. - Click .
- Repeat the steps for each attribute to be indexed.
Verification
-
Filter Indexesby typing the name of the added attribute. - The newly indexed attribute should appear in the results.
Additional resources
- TBA xref Logging in to an instance in the web console
- TBA About Index Types
- TBA Managing Indexes
- TBA Internationalization
- TBA Using Matching Rules OR Reference of OIDs
Chapter 4. Switching a database to read-only mode
Databases of Directory Server run in read-write mode by default, in which users can both retrieve and store data.
When you need a faithful image of a database at a given time, for example before a backup or before a manual initialization of a consumer, you may switch a database to read-only mode that prevents users from creating, modifying, or deleting entries.
4.1. Prerequisites
- The database is in read-write mode.
- The database is not used in replication, since enabling read-only mode disables replication.
4.2. Switching a database to read-only mode using the command line
This procedure instructs you how to switch a Directory Server database to read-only mode on the command line.
Procedure
-
List the suffixes and their corresponding databases:
#
dsconf -D "cn=Directory Manager" ldap://server.example.com backend suffix listdc=example,dc=com (userroot) o=test (test_database)Note the name or suffix of the database that you want to switch.
-
Enable read-only mode with the
--enable-readonlyparameter and specify the database either by name or suffix:#
dsconf -D "cn=Directory Manager" ldap://server.example.com backend suffix set --enable-readonly "test_database"
Verification
-
Attempt a write operation to the directory, such as:
#
ldapmodify -D "cn=Directory Manager" -W -h ldap://server.example.com -xdn: dc=example,dc=com changetype: modify add: description description: fooThe server should refuse to perform.
modifying entry "dc=example,dc=com"
ldap_modify: Server is unwilling to perform (53)
	additional info: Server is read-only
Additional resources
4.3. Switching a database to read-only mode using the web console
This procedure instructs you how to switch a Directory Server database to read-only mode in a browser.
Prerequisites
- You are logged in to the instance in the web console.
Procedure
-
Under
Database, select the suffix in the configuration tree. -
Check the
Database Read-Only Modeoption. - Click .
Verification
-
Attempt a write operation to the directory, such as:
#
ldapmodify -D "cn=Directory Manager" -W -h ldap://server.example.com -xdn: dc=example,dc=com changetype: modify add: description description: fooThe server should refuse to perform.
modifying entry "dc=example,dc=com"
ldap_modify: Server is unwilling to perform (53)
	additional info: Server is read-only
Additional resources
- Switching an entire instance to read-only mode
- TBA xref Logging in to an instance in the web console
4.4. Additional resources
- TBA Initializing consumers for replication
- TBA Backing up databases
Chapter 5. Switching an instance to read-only mode
By default, instances run in read-write mode, in which users can both retrieve and store data. In emergency cases, such as when you want to prevent replication or disable modification of data during reindexing, but keep the directory available, you can temporarily switch the instance to read-only mode.
If Directory Server maintains more than one database and all databases need to be switched to read-only, you can do this in a single operation, on the command line or in the web console.
In read-only mode, you cannot restart the instance, but you may still modify the configuration.
If you stop an instance in read-only mode, you cannot start it again until you manually disable read-only mode.
To disable read-only mode manually, open the /etc/dirsrv/slapd-instance_name/dse.ldif file, navigate to the cn=config section, and set the nsslapd-readonly parameter to off.
5.1. Prerequisites
- The instance is in read-write mode.
- The instance is not used in replication, since enabling read-only mode disables replication.
5.2. Switching an instance to read-only mode using the command line
This procedure instructs you how to switch a Directory Server instance to read-only mode on the command line.
Procedure
-
Set the
nsslapd-readonlyparameter toon:#
dsconf -D "cn=Directory Manager" ldap://server.example.com config replace nsslapd-readonly=on
Verification
-
Attempt a write operation to the directory, such as:
#
ldapmodify -D "cn=Directory Manager" -W -h ldap://server.example.com -xdn: dc=example,dc=com changetype: modify add: description description: fooThe server should refuse to perform.
modifying entry "dc=example,dc=com"
ldap_modify: Server is unwilling to perform (53)
	additional info: Server is read-only
Additional resources
5.3. Switching an instance to read-only mode using the web console
This procedure instructs you how to switch a Directory Server instance to read-only mode in a browser.
Prerequisites
- You are logged in to the instance in the web console.
Procedure
-
Under
Server Settings, select theAdvanced Settingstab. -
Check the
Server Read-Onlyoption. - Click .
Verification
-
Attempt a write operation to the directory, such as:
#
ldapmodify -D "cn=Directory Manager" -W -h ldap://server.example.com -xdn: dc=example,dc=com changetype: modify add: description description: fooThe server should refuse to perform.
modifying entry "dc=example,dc=com"
ldap_modify: Server is unwilling to perform (53)
	additional info: Server is read-only
Additional resources
- Switching an individual database in an instance to read-only mode
- TBA xref Logging in to an instance in the web console
Chapter 6. Deleting a database of a suffix that is no longer needed
When you need to reclaim disk space on your Directory Server host, you can delete databases of suffixes that are not in use anymore.
6.1. Deleting a database using the command line
This procedure instructs you how to delete a Directory Server database on the command line.
Procedure
-
List suffixes and their corresponding databases:
#
dsconf -D "cn=Directory Manager" ldap://server.example.com backend suffix listdc=example,dc=com (userroot) o=test (test_database)Note the name of the database that you want to delete.
-
Enter the
dsconf backend deletecommand and specify the name of the database:#
dsconf -D "cn=Directory Manager" ldap://server.example.com backend delete "test_database" -
Confirm the deletion by typing "Yes I am sure" in the prompt:
Deleting Backend cn=test_database,cn=ldbm database,cn=plugins,cn=config :
Type 'Yes I am sure' to continue: Yes I am sure
Verification
-
List the suffixes/databases:
#
dsconf -D "cn=Directory Manager" ldap://server.example.com backend suffix listdc=example,dc=com (userroot)
6.2. Deleting a database using the web console
This procedure instructs you how to delete a Directory Server database in a browser.
Prerequisites
- You are logged in to the instance in the web console.
Procedure
-
Under
Database, select the suffix that you want to delete. - Navigate to → .
-
Select
Yes, I am sure.. - Click .
Verification
-
Under
Database, review the list of suffixes in the configuration tree.